
Copy of Guided Pilot Holes in Implant Placement: Safety, Reproducibility and STECO Drill Sleeve Options
A guided implant case is only as accurate as its first osteotomy. Once the pilot hole is off-axis, every later drill tends to follow that error. That is why guided pilot holes play such a central role in implant placement. They are the first physical transfer of the digital plan into bone, and they set the direction for depth, angulation, and restorative emergence.
A surgical guide does not make implant surgery automatic. It gives the clinician a controlled path. The drill sleeve is the mechanical interface that makes that path repeatable. When the guide is stable, the sleeve is correctly selected, and the drill protocol is respected, the pilot hole can be placed with a high level of safety and consistency.
This article is for informational purposes only. Clinical decisions should follow the implant system protocol, the sleeve manufacturer’s instructions for use, and the clinician’s judgment.
Why the pilot hole carries so much clinical importance
The pilot hole defines the first confirmed path through bone. In freehand surgery, the clinician controls this path by visual judgment, tactile feedback, and anatomic experience. In guided surgery, the plan adds a reference frame. The CBCT data, prosthetic setup, implant library, and guide design all point toward one planned drilling trajectory.
The pilot drill brings that trajectory into clinical reality.
A well-guided pilot hole helps control several critical factors:
Entry point
The implant should begin at the planned restorative and surgical position, not simply where bone looks most accessible.
Angulation
The long axis must respect adjacent roots, nerves, sinus anatomy, buccal plates, and the planned prosthetic axis.
Depth
The osteotomy should remain within the intended safety envelope.
Sequence
Later drills are more predictable when the pilot hole provides a clean, centered path.
Even small deviations at the coronal entry can grow apically. This matters most near sensitive structures, in narrow ridges, in the esthetic zone, and in cases with limited interradicular space. Good sleeve guidance reduces the chance that the pilot drill will skid, tilt, or widen the hole in an uncontrolled direction.
Guided pilot holes also support reproducibility. When the same planning principles, sleeve selection, guide fit checks, and drilling protocol are used case after case, outcomes become less dependent on improvisation. That does not remove the need for surgical skill. It gives skill a more precise framework.
How drill sleeves help transfer the digital plan
The digital plan describes the intended implant position. The guide and sleeve translate that plan into a controlled drill path.
A drill sleeve does this by creating a fixed cylinder or funnel-guided channel within the surgical guide. The drill passes through that channel, which limits lateral movement and helps maintain the planned angle. The quality of that control depends on several details.
Sleeve diameter and drill diameter must match the protocol. If clearance is too great, the drill can wobble. If clearance is too tight, friction, heat, or binding may occur.
Sleeve height influences angular control. A taller guiding surface generally gives more directional support, provided there is enough vertical space and the drill can still be used safely.
Sleeve position and offset must be correct. Guided systems often define the relationship between the sleeve and implant platform or drill stop. If the offset is wrong, depth control may be compromised.
Guide stability matters as much as sleeve design. A perfect sleeve in a poorly seated guide will still transfer an incorrect position.
The drilling path must remain clean. Bone chips, soft tissue interference, or incomplete irrigation can affect the feel and accuracy of the osteotomy.
The drill sleeve is not just a metal insert. It is a calibrated part of the surgical guide system. Its geometry, fit, and position influence how faithfully planning becomes practice.

STECO drill sleeve options support controlled guidance
STECO is known in guided implant workflows for precision drill sleeves used in surgical guides. The exact sleeve choice depends on the implant system, guide design, drill protocol, and available vertical space. In general, STECO drill sleeves are selected to give the drill a defined path while fitting securely into the printed or milled guide.
The main distinctions clinicians and dental laboratories consider include sleeve geometry, internal diameter, sleeve height, external retention form, and whether the sleeve is intended for direct drill guidance or use with guided keys or adapters.
STECO sleeve option | Distinctive feature | Primary benefit | Typical use |
Single sleeve | A straight cylindrical sleeve with one guiding channel | Direct, stable guidance for a matching drill or guided instrument | Pilot drilling and system-specific guided protocols |
Hopper sleeve | A funnel-shaped coronal entry that narrows into the guide channel | Easier drill introduction and improved centering before full guidance | Posterior regions, limited access, and pilot guidance where entry control matters |
System-matched sleeve dimensions | Available in dimensions suited to specific drill and guide concepts | Helps maintain the planned relationship between sleeve, drill, and implant position | Implant workflows that require defined offsets and drill diameters |
Different sleeve heights | Shorter or taller guiding surfaces depending on case requirements | Balances access with angular control | Cases with varying interocclusal space and guide thickness |
Retentive outer designs | Exterior geometry helps the sleeve seat securely in the guide | Reduces movement between sleeve and guide body | Printed or milled guides that require reliable sleeve fixation |
The key value is controlled drill guidance. STECO sleeves are not chosen only because they fit inside a guide. They are chosen because they help maintain the intended relationship between the surgical plan, the guide body, and the drill.
Single sleeves provide direct cylindrical control
A single sleeve is the classic guide sleeve concept. It has a straight internal channel that guides the drill along a defined axis. When the correct drill diameter is used, the sleeve limits lateral movement and stabilizes the drill direction.
This makes single sleeves useful when the workflow needs clear, direct guidance. The clinician inserts the drill through the sleeve, advances along the planned path, and relies on the sleeve’s internal wall to control angulation.
The benefits are straightforward:
Predictable axial guidance
Simple guide design
Direct visual and tactile understanding
Strong support when adequate sleeve height is available
Clear compatibility with defined guided protocols
Single sleeves are often preferred when access is good and the planned sleeve position gives enough room for the drill handpiece and shaft. They are especially useful in workflows where each step has a matched guided component.
Hopper sleeves improve drill capture at entry
A hopper sleeve uses a wider coronal opening that narrows toward the guiding channel. The shape resembles a small funnel. This makes it easier to introduce the drill into the sleeve, especially when visibility or access is limited.
The funnel form helps guide the drill tip or shaft toward the central channel before the drill fully engages the cylindrical guidance area. That can reduce the risk of catching the sleeve edge or entering the osteotomy path at a slight angle.
Hopper sleeves are especially useful in areas where clinical handling is more difficult:
Posterior mandible or maxilla
Limited mouth opening
Distal extension sites
Angled access around adjacent teeth
Cases where seating the drill into a straight sleeve is less comfortable
A hopper sleeve does not replace accurate guide fit or careful drilling technique. Its value is in making controlled drill engagement easier. That small improvement at the start of drilling can support a more predictable pilot hole.
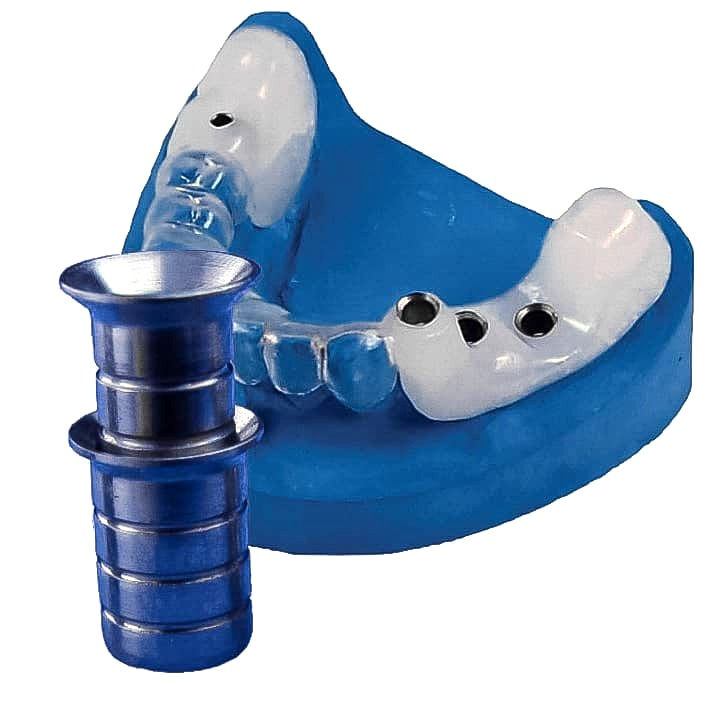
Single sleeves and hopper sleeves guide the drill in different ways
Both single sleeves and hopper sleeves support controlled drill guidance, but they do it with different handling characteristics.
A single sleeve guides the drill through a straight cylindrical bore. The drill must enter the sleeve cleanly, then the sleeve walls maintain the planned axis. This design gives precise guidance when the drill and sleeve are aligned from the start.
A hopper sleeve adds a lead-in zone. The wider upper opening helps the drill find the channel. Once the drill reaches the narrower guiding portion, it functions like a controlled sleeve pathway. The difference is most noticeable during drill introduction.
Single sleeve
Hopper sleeve
Best suited when access is direct, visibility is good, and the clinician can introduce the drill in line with the sleeve.
Helpful when access is tight, the drill angle is harder to establish, or a more forgiving entry into the guide channel is desired.
The choice is not about which sleeve is universally better. It is about matching the sleeve to the clinical situation.
For anterior cases with ample access, a single sleeve may provide simple and precise control. For posterior sites or patients with restricted opening, a hopper sleeve can make the first engagement smoother. In both cases, the sleeve must be correctly positioned in the guide and paired with the intended drill.
The strongest workflows treat sleeve selection as part of planning, not as a lab detail added later.
How guided pilot holes reduce deviation
Deviation can occur at several points between the digital plan and the final osteotomy. Guided pilot holes reduce that risk by controlling the earliest and most direction-sensitive part of drilling.
Common sources of deviation include:
Inaccurate image matching between CBCT and surface scan
Poorly fitting or unstable surgical guide
Sleeve position errors during guide fabrication
Excess clearance between drill and sleeve
Insufficient sleeve height for angular control
Drill deflection on dense or sloped cortical bone
Excess pressure from the clinician
Incomplete guide seating during drilling
A guided pilot hole addresses many of these risks, but only if the entire workflow is controlled.
The guide should seat passively and fully. Tooth-supported guides need stable contact on the planned teeth. Mucosa-supported guides may need extra verification because soft tissue can compress. Bone-supported guides require careful exposure and seating checks.
The drill should be introduced without forcing it against the sleeve wall. Heavy lateral pressure can turn the sleeve into a pivot point. A light, controlled motion allows the drill to follow the intended axis.
Irrigation also matters. Sleeves can limit direct visibility and may affect cooling compared with freehand drilling. The protocol should allow adequate irrigation and chip removal. Heat control is part of surgical safety, not a secondary detail.
Guided pilot holes have the greatest value when they define the path early, before wider drills remove more bone. Once the pilot osteotomy is accurate, later expansion can follow a more predictable course.
Bringing the digital plan into clinical practice
Digital planning has no clinical value unless it transfers accurately to the patient. That transfer depends on a chain of steps, and the drill sleeve sits near the end of that chain.
A predictable workflow usually includes the following sequence:
Acquire accurate diagnostic data
CBCT imaging and surface scans must capture the anatomy, teeth, mucosa, and prosthetic plan clearly enough for reliable matching.
Plan from the restoration backward
Implant position should relate to the planned crown, screw access or abutment design, bone volume, and anatomic limits.
Select the sleeve during guide planning
Sleeve type, diameter, height, and offset should match the surgical kit and clinical access. This is where the choice between a single sleeve and hopper sleeve can affect handling.
Design the guide for stability
The guide needs enough support, inspection windows where useful, and a sleeve position that allows instrument access.
Check sleeve seating and fixation
The sleeve must be fully seated and secure in the guide before surgery. Any movement between sleeve and guide body can affect accuracy.
Verify the guide intraorally
The clinician should confirm complete seating before drilling and recheck it during the procedure if anything feels unstable.
Drill with controlled pressure
Let the sleeve guide the path. Avoid using the drill to push or torque the guide.
Confirm the pilot path when indicated
In complex cases, depth gauges, radiographs, or other verification steps may help confirm that the osteotomy follows the plan.
This workflow supports reproducibility because each step has a defined purpose. The guide does not only show where to drill. It creates a physical pathway that carries the plan into surgery.

Practical points for choosing a STECO sleeve
When selecting a STECO sleeve, the clinical and laboratory teams should focus on function rather than habit. The best sleeve is the one that supports the planned implant position, fits the guide design, and allows safe instrument access.
A few practical questions help guide the choice:
Is the case limited by vertical space?
Is the implant site in the posterior region?
Can the drill enter the sleeve directly without contacting adjacent teeth?
Does the protocol require direct drill guidance, guided keys, or adapters?
Is the planned sleeve height enough for angular control?
Will the guide material securely retain the sleeve?
Can irrigation reach the drilling site adequately?
Does the sleeve position allow visual confirmation of guide seating?
For a straightforward anterior or premolar case with good access, a single sleeve may provide clean and direct guidance. For a molar site with limited access, a hopper sleeve may make drill introduction more controlled. For a case with tight interocclusal clearance, sleeve height and drill length may become the deciding factors.
The sleeve should also match the documented surgical protocol. Mixing components across systems without clear compatibility can introduce errors in diameter, offset, or depth control. In guided implant surgery, small mismatches can create meaningful clinical consequences.
The real value is controlled execution
Guided pilot holes improve safety because they help protect the planned anatomic boundaries. They improve reproducibility because they give the clinician a repeatable mechanical pathway. STECO drill sleeves support that process by offering controlled guidance options, including direct single sleeves and easier-entry hopper sleeves.
The central principle is simple: the pilot hole should represent the digital plan with as little deviation as possible. That requires accurate data, careful planning, a stable guide, the right sleeve, and disciplined drilling technique.
When those elements work together, guided implant placement becomes more than a digital exercise. It becomes a precise clinical workflow where the first millimeters of drilling support the success of everything that follows.
Comments